
In the meantime, the All Along the Watchtower podcast asked me to come along and talk Flames of War whilst Matt got his move on.
During the pod cast we talk about "Hellfire and Back", the finer points of Sherman tank design (in response to the rather tasty Plastic Soldier Company) and the SMLE. There's also some non-flames stuff too!
Let's talk about the Sherman kits. I was worried about monopolizing the whole podcast on a subject most people don't care about so I want to use this blog post to cover some of the minute detail of the Sherman and how the kits relate to it
Firstly, I like the look of the CAD sculpts and hopefully I don't come off as too negative on the pod cast. These Shermans look pretty sweet and my only complaint with regards to the sculpt, as I discuss on the podcast, is the bow machine gun. The .30 cal barrel looks a little fat and under-detailed compared to the rest of the kit. It's something that can easily be fixed courtesy of a bit of pinning and some Skytrex .30 cals but it seems a bit of a slip on the sculptors part.
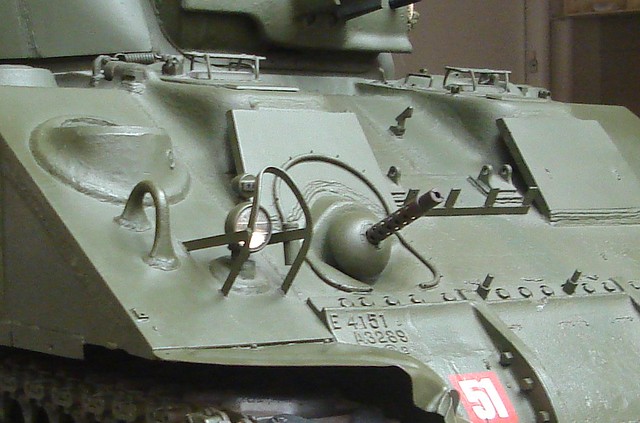 |
| Bow MG on a British Sherman III |
Okay, so lets look at each kit and what it can do straight out of the box and what we can possibly make it do!
M4A1 Sherman II 75mm Dry Hull
The Sherman II made its operational debut with 8th Army in the El Alamein battles. The Sherman II had a cast hull and a petrol engine. It was used by the British throughout Africa, into Tunisia and then on to Italy. The M4A1 saw its debut with the US in Operation Torch and was used throughout the ETO from that point onwards.
(The 'Dry' hull / 'Wet' hull denotes the ammo protection. The later 'wet' hull adds bigger hatches for escape and water protection around the ammo).
(The 'Dry' hull / 'Wet' hull denotes the ammo protection. The later 'wet' hull adds bigger hatches for escape and water protection around the ammo).
 |
| From Plastic Soldier Company |
For doing a Sherman M4A1 in US service from late '43 onwards (so mainland Italy and Normandy) we can take the model straight out of the box. The applique armour started appearing from summer '43. Strictly there should be two extra plates in front of the driver and co-driver position (you can see them in the bow MG photo above). They can be added quite easily with a bit of plasticard. The cast one piece hull could be used for a later production example but the bolted three piece nose is more common early on. Don't forget to add stowage!
For doing a 1942-early '43 Op Torch era Sherman we're going to need to file the applique armour off. The appliqué armour was added to the 'dry' hull to add protection in the areas where ammo is stowed and this started to appear in the summer of 1943 as crews realised why they were brewing up (nothing to do with the petrol engine).
I'm thinking a Dremel should do the trick, working from the centre of each plate outwards. Nose should be the three piece option (as shown on the CAD sculpt) and Sand Shields should be fitted.
The British Shermans are a bit trickier. For the most part they will look like their US equivalent for the period but the Brits welded a round edged stowage bin onto the rear of the turret. This is missing from the kit and will require a bit of plasti-card work to replicate. I plan to do a full squadron of 16 tanks so the dremel and plasticard will be getting some heavy use.
 |
| Sherman II in North Africa. Note stowage bin and lack of appliqué armour |
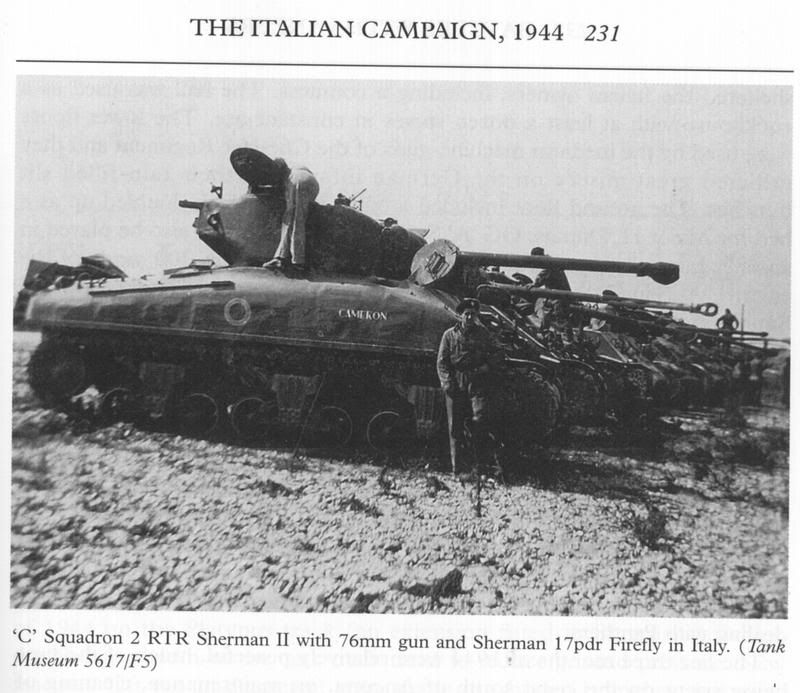
This kit is pretty good out of the box. It's used by the US mainly but the UK and other commonwealth/free armies (South Africa, Poland) did use them (2nd Armoured Brigade in Italy). Looking around for photos, it looks like the UK didn't find any need to fit stowage bins. Nose should be the cast one piece option (no three piece transmission covers where used on the late production).
The 76mm gun should be the only one fitted to this hull and will appear from mid 44 onwards in places like Normandy and then later in Italy (late 44).
This version of the Sherman, a diesel powered welded hull, was used by the Lend-Lease forces (UK and USSR) and USMC. It's also pretty similar in looks to the gasoline powered Sherman I (M4) and Sherman IV (M4A3), differing mostly in the engine deck detail, which gives it more utility for the US players.
The model uses the original 'dry' hull so strictly is only used with a 75mm gun and turret.
This variant made its debut with British forces in North Africa around about El Alamein. It also appeared in large numbers with the Soviets.
A UK example pre-43 should have the Sand Shields on and the appliqué armour filed off. It should have a stowage bin on the turret rear. Late 43 (Italy and Normandy) then the appliqué armour can stay on. Hopefully the scale will be good enough to allow it to be matched up with a Battlefront Sherman VC for a Normandy troop.
A USSR example should be fairly easy to achieve out of the box. Factory fitted appliqué armour should be a feature of late-war ones as deliveries were made. Initial deliveries should be reflected by filing applique armour off. No Russian commander which is a shame but most Russian players probably have a bag of them spare anyway and they are easily sourced elsewhere. As mentioned, the hull is incorrect for a 76mm armed example, but given the number of tanks a Russian player needs to buy, I'd be inclined to turn a blind eye to that!
Finally, the US ones should follow similar lines to the UK, less stowage bins. If being used as a stand in for a Sherman I (M4) in Operation Torch then the armour should be filed off. Otherwise, your good to go.
Now, all I need is some cash to buy three boxes of Sherman II for my desert army and some more plasti card!
 |
| From Plastic Soldier Company |
 |
| M4A1 Sherman IIA (76mm Wet Hull) in UK service. |
 |
| From Plastic Soldier Company |
This variant made its debut with British forces in North Africa around about El Alamein. It also appeared in large numbers with the Soviets.
A UK example pre-43 should have the Sand Shields on and the appliqué armour filed off. It should have a stowage bin on the turret rear. Late 43 (Italy and Normandy) then the appliqué armour can stay on. Hopefully the scale will be good enough to allow it to be matched up with a Battlefront Sherman VC for a Normandy troop.
A USSR example should be fairly easy to achieve out of the box. Factory fitted appliqué armour should be a feature of late-war ones as deliveries were made. Initial deliveries should be reflected by filing applique armour off. No Russian commander which is a shame but most Russian players probably have a bag of them spare anyway and they are easily sourced elsewhere. As mentioned, the hull is incorrect for a 76mm armed example, but given the number of tanks a Russian player needs to buy, I'd be inclined to turn a blind eye to that!
Finally, the US ones should follow similar lines to the UK, less stowage bins. If being used as a stand in for a Sherman I (M4) in Operation Torch then the armour should be filed off. Otherwise, your good to go.
Conclusion
So, out of the box, these kits are great for doing late 43 onwards example of the Shermans and I really recommend looking into them. It would have been great if the appliqué armour had been left separate and a stowage box offered as an option but these are all fairly easy things to fix if your so inclined. The vast majority of players will probably say a 'Sherman is a Sherman' and leave it at that which is fair enough. But spending a bit of time getting the tank looking right for the period will pay dividends in terms of theming a force.Now, all I need is some cash to buy three boxes of Sherman II for my desert army and some more plasti card!
For me, the plastic toy soldier company makes me want to start collecting yanks, brits, russians and a grenadier company, the quality and price are awesome, the touches i like with all the tanks are the amount of variants each box comes with or like the above yank or brit commanders, just great.
ReplyDeleteMyslef, I'm looking forward to a StuG III model. That would get my late war German army project kicked off.
ReplyDelete